

The Appointment activities management module allows the administrator account owner to add, modify, and delete the types of appointments available in your clinic. It allows, among other things, to configure a message to be displayed in all appointment communications linked to an activity and to choose the statuses to be linked to the activity.
⚠️ Only designated people can use the administrator account. To do this, you must have access rights, which are given by Omnimed at the request of the clinic manager or an authorized person.
Add an activity
- Access the administrator account.
- Click on Manage activies in the Appointment management section.
- Click on the + in the lower right corner.
- Complete the default information associated with the new activity:
- Color;
- Name;
- Duration (can be removed from the appointment communications).
- Default appointment type (in person, telephone, online, home visit or other);
- Instructions for the appointment (this message is displayed by default on all activity-related appointment communications when the appointment type is Other);
- Note for the patient* (this message is displayed by default on all activity-related appointment communications)

- Check the Customize the associated statuses box to modify the statuses associated with the activity by default.
- Click on Add to save the activity.
ℹ️ *The note to the patient allows you to insert a standard text template into the communication.
This allows you, for example, to provide the patient with more details about where to go for their appointment, instructions to follow beforehand, an explanation of how the session will unfold, hyperlinks to resources to review prior to the appointment, information about any associated fees, etc.
Please note that rich text formatting is not currently supported. You can use "-", "*", spaces, and line breaks to format the text.
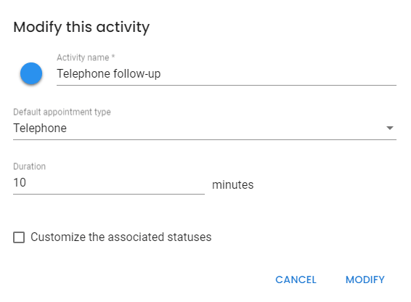
Modify an activity
- Place the cursor on the line associated with the activity and click on the pencil icon.

- Modify the information of your choice (color, name, default appointment type, note for the patient, duration, statuses associated) and click on Modify.
⚠️ If you modify an existing activity, a warning will appear asking whether you'd like to apply the changes to already scheduled future appointments. If you apply the changes, any patient notes manually added when the appointments were created will be lost.

Delete an activity
- Place the cursor on the line associated with the activity and click on the bin icon.

- Confirm the deletion of the activity by clicking on Delete.
