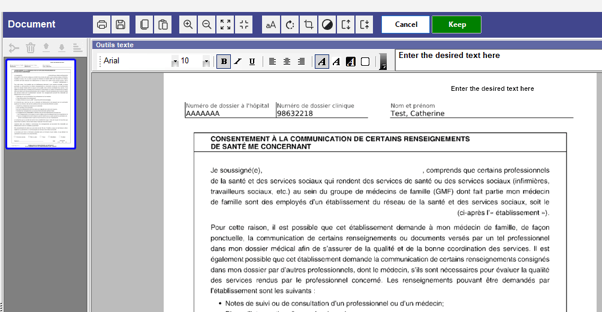
Once documents have been transferred to the scanning module, it is possible to make changes to them before filing them in the EMR. Here's a list of the tools you can use to make modifications.
Training video
Modify a scanned document
Delete a scanned document
Organize pages within a document
Actions on a document (print, save, edit, etc.)
🎦 Scanning module training - Scanning steps 1-2-3 (18 min)
Modify a scanned document
Three tools are available in the left-hand navigation menu for editing scanned documents.
Select multiple documents: Click individually in the box associated with a document to select it for action, or click on the Select All button to select or deselect all documents.
 Merge documents: select the documents to be merged in the desired page order, then click on the Merge button to merge these separate documents into a single document.
If each page of a document appears individually, and it is necessary to combine these pages into a single document, select the pages in the desired order and click on Merge.
The new merged document is displayed where the first selected page was.
This feature can be applied to any document.
To change the page order of a document, refer to Organizing document pages.
 Group pages from previously separated batch into one document: allows you to group pages from a batch scanned with the "Split pages" option.
Select one of the pages in the batch, then click on the Group pages from previously separated batch into one document into one document button.
This feature can only be applied to a scanned batch whose pages have been separated.

Delete a scanned document
- Select the document(s) to be deleted.

- Click on the trashcan icon.
Organize pages within a document
Split pages into separate documents (unmerge).
Delete selected page(s).
Move selected page up.
Move selected page down.
Reorder pages according to selection order (hold down Ctrl key, select pages in desired order and then click button).
Actions on a document
Extract a document
 Print
Print
 Save: It allows to save as .tif or .pdf file.
Duplicating a page
 Copy and Paste: duplicate a page.
- Duplicate a page in the same document:
- Select page.
- Click on Copy.
- Click on Paste.
- Duplicate a page in another document:
- Select page.
- Click on Copy.
- In the left-hand menu, select the document to which the page is to be added.
- Click on Paste.
- Duplicate a page in a new document:
- Select page.
- Click on Copy.
- Click on Paste in the left-hand menu.
- Duplicate a page in the same document:
Adjust display of documents
 Zoom in : To zoom in on a page.
 Zoom out: To zoom out on a page.
 Fit to width: Displays the page at full screen width.
 Fit to page: To view the full page.
Page Editing
 Add text : Add text to a page.
- Text formatting editor available.
-
- Changes can be undone if not saved.
- Once changes have been saved, text cannot be modified or removed.

 Rotate: Allows you to change the orientation of the page by rotating it 90 degrees clockwise.
-
- Changes can be cancelled or saved.
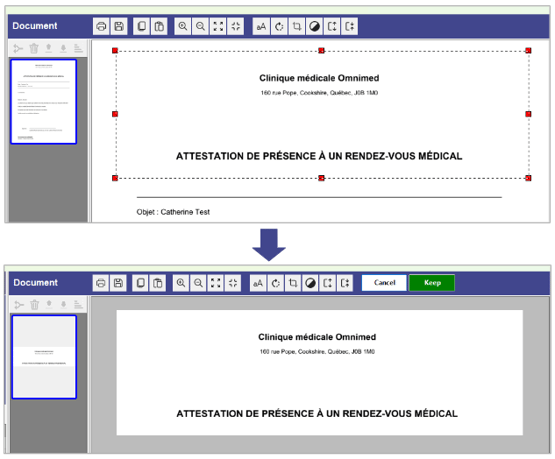
 Crop: Allows you to reframe the page content to retain only the desired part.
- Changes can be cancelled or saved.
- Once changes have been saved, it is not possible to return to the original image.
-
-
- Steps to follow :
- Click on Crop.
- Using the selection tool, select the area to be preserved.
- Click on Crop again.
- Save changes.
- Steps to follow :
-

 Change to black and white : Converts the selected color page(s) to black and white and reduces the size of the document. 💡Converting to black and white reduces the size of the document and thus improves its accessibility in the patient file by reducing download time. A black and white document is 10 times smaller than a color document.
 Stretch : Allows you to stretch a page with a squashed display, e.g. a fax received with horizontally compressed text.
 Compress: Compresses a stretched page.
➡️ Next step
Step 3 - Index and classify scanned documents